|
| Complate setup C# in Visual Studio Code. |
1. Short introducation to c# programming language.
2. Short introducation to .NET Framework.
4. Short introducation to Visual Studio Code
5. Download Visual Studio Code and setup
6. Create one empty folder and open it in visual studio code
7. Creating C# project in visual studio code
8. Download two extension in visual studio code
9. Run First File in Visual Studio Code
10. Run multiple class file in one c# project
Introducation to C#(CSharp) programming language :
C# is a general-purpose, modern and object-oriented programming language pronounced as “C sharp”. It was developed by Microsoft led by Anders Hejlsberg and his team within the .Net initiative and was approved by the European Computer Manufacturers Association (ECMA) and International Standards Organization (ISO). C# is among the languages for Common Language Infrastructure and the current version of C# is version 7.2. C# is a lot similar to Java syntactically and is easy for the users who have knowledge of C, C++ or Java.
Introducation to .NET Framework :
.NET is a software framework that is designed and developed by Microsoft. The first version of the .Net framework was 1.0 which came in the year 2002. In easy words, it is a virtual machine for compiling and executing programs written in different languages like C#, VB.Net, etc. It is used to develop Form-based applications, Web-based applications, and Web services and also used to build applications for Windows, phones, web, etc.
Downalod .NET :
First of all download .NET Freamework
Short introducation to Visual Studio Code :
Visual Studio Code is a source-code editor that can be used with a variety of programming languages, including Java, JavaScript, C#, Go, Node. js, Python and C++. It is based on the Electron framework, which is used to develop Node. js Web applications that run on the Blink layout engine.
Download Visual Studio Code and setup :
Downalod Visual Studio Code according your OS(operating system).
After download VS CODE open it and check the
I am accept the agreement checkbox.
Click on next button.
Check 5 checkboxes like the above image.
Create one empty folder and open it in visual studio code :
Create one empty folder.
Open that folder in vs code. Right click to mouse and click on Open With Code like above image.
Creating C# project in visual studio code :
After open VS CODE go to Terminal > new Terminal in VS CODE like above image.
After open terminal type dotnet new console.Hit Enter button.
You can see some folder structure are generated in folder panel in left side corner.
Download two extension in visual studio code :

|

|
Download two extension in VS CODE :
1. C# extension provides the following features :
-> Lightweight development tools for .NET Core.
-> Great C# editing support, including Syntax Highlighting, IntelliSense,
Go to Definition, Find All References, etc.
-> Debugging support for .NET Core (CoreCLR).
-> Support for project.json and csproj projects on Windows, macOS and
Linux.
2. Code Runner : Code Runner allows you to Run code snippet or code
file for multiple languages:
Run First File in Visual Studio Code :
You can run C# class file using two method :
1.Open VS CODE terminal and type dotnet run your_class_filename.
2.Using VS CODE extension - Code Runner
1. Using VS CODE terminal :
Open Program.cs file.
Open terminal and type
dotnet run Program.cs for run Program.cs file.
Hit Enter button.
2.Using VS CODE extension :
Install Code Runner extension in VS CODE.

|

|
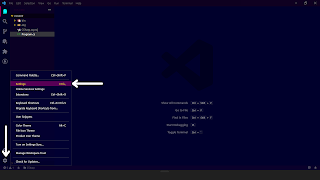
Go to setting > Type Json on the
search bar given in above.
Paste below code there.
{
    "code-runner.executorMap": {
        "javascript": "node",
        "java": "cd $dir && javac $fileName && java $fileNameWithoutExt",
        "c": "cd $dir && gcc $fileName -o $fileNameWithoutExt && $dir$fileNameWithoutExt",
        "cpp": "cd $dir && g++ $fileName -o $fileNameWithoutExt && $dir$fileNameWithoutExt",
        "objective-c": "cd $dir && gcc -framework Cocoa $fileName -o $fileNameWithoutExt && $dir$fileNameWithoutExt",
        "php": "php",
        "python": "python -u",
        "perl": "perl",
        "perl6": "perl6",
        "ruby": "ruby",
        "go": "go run",
        "lua": "lua",
        "groovy": "groovy",
        "powershell": "powershell -ExecutionPolicy ByPass -File",
        "bat": "cmd /c",
        "shellscript": "bash",
        "fsharp": "fsi",
        "csharp": "cd $dir; dotnet run $fileName",
        "vbscript": "cscript //Nologo",
        "typescript": "ts-node",
        "coffeescript": "coffee",
        "scala": "scala",
        "swift": "swift",
        "julia": "julia",
        "crystal": "crystal",
        "ocaml": "ocaml",
        "r": "Rscript",
        "applescript": "osascript",
        "clojure": "lein exec",
        "haxe": "haxe --cwd $dirWithoutTrailingSlash --run $fileNameWithoutExt",
        "rust": "cd $dir && rustc $fileName && $dir$fileNameWithoutExt",
        "racket": "racket",
        "scheme": "csi -script",
        "ahk": "autohotkey",
        "autoit": "autoit3",
        "dart": "dart",
        "pascal": "cd $dir && fpc $fileName && $dir$fileNameWithoutExt",
        "d": "cd $dir && dmd $fileName && $dir$fileNameWithoutExt",
        "haskell": "runhaskell",
        "nim": "nim compile --verbosity:0 --hints:off --run",
        "lisp": "sbcl --script",
        "kit": "kitc --run",
        "v": "v run",
        "sass": "sass --style expanded",
        "scss": "scss --style expanded",
        "less": "cd $dir && lessc $fileName $fileNameWithoutExt.css",
        "FortranFreeForm": "cd $dir && gfortran $fileName -o $fileNameWithoutExt && $dir$fileNameWithoutExt",
        "fortran-modern": "cd $dir && gfortran $fileName -o $fileNameWithoutExt && $dir$fileNameWithoutExt",
        "fortran_fixed-form": "cd $dir && gfortran $fileName -o $fileNameWithoutExt && $dir$fileNameWithoutExt",
        "fortran": "cd $dir && gfortran $fileName -o $fileNameWithoutExt && $dir$fileNameWithoutExt"
    },
}
After paste above code restart your VS CODE IDE.
Run your c# class by clicking on play button in top right side in VS CODE.
Run multiple class file in one c# project :
First thing write your all program content to a namespace block.
Open Your_Project_Name.csproj file in your left side folder panel in VS CODE.
Copy this below code and paste this code there.
<Project Sdk="Microsoft.NET.Sdk">
    <PropertyGroup>
      <OutputType>Exe</OutputType>
      <TargetFramework>net6.0</TargetFramework>
      <ImplicitUsings>enable</ImplicitUsings>
      <Nullable>enable</Nullable>
      <StartupObject>CSharp.Program</StartupObject>

      <!--<StartupObject>NameSpace.Your_ClassFileName<StartupObject>-->
    </PropertyGroup>
  </Project>
If you wants to run multiple file only one change you have to do :
<StartupObject>CSharp.Write_Your_ClassFile_Name_Here</StartupObject>


0 Comments
Enter Your Comment